
A character illustration can work perfectly as a still image, but a little movement opens up other ways to use it. With the right tools, you can turn a flat character illustration into a sharp animated intro, add dynamic magical effects, or create a high-engagement social media portrait.
The challenge is preserving the artwork you’ve already finished. Your character needs to blink, turn their head, or move their hair without altering their face, clothing, or overall design.
Anime AI video generators let you animate an existing illustration using motion prompts and, in some workflows, additional frame controls. The tools differ in how they handle movement, output settings, and visual consistency.
Here’s what to consider when choosing one, with a practical look at how PixAI fits into an anime creator’s workflow.
What Image to Video Does
Think of image-to-video tools as a way to breathe life into the artwork you already made. With an AI anime art platform like PixAI, you can take a finished illustration, type what you want it to do, and watch the engine turn your static art into a quick clip.
For example, you can take a drawing of a silver-haired mage sitting in an old library and have her look over at a glowing orb, her hair drift in the wind, or the magic light pulse across the room. Your original picture handles the looks, and your text prompt handles the action.
Every tool gives you a different amount of control. Some let you upload a starting frame and an ending frame so you can map out the exact movement. Keep in mind the AI engine might still tweak the face, outfit, or background as it creates the new frames.
This setup is perfect for quick character previews, social media clips, or short promos. Do not expect it to output a full anime episode. Longer videos require complex sequencing, dialogue, sound design, and strong continuity, so it’s better to use AI for individual shots and do the heavy editing yourself.
What to Check Before Choosing
Can you use your own image?
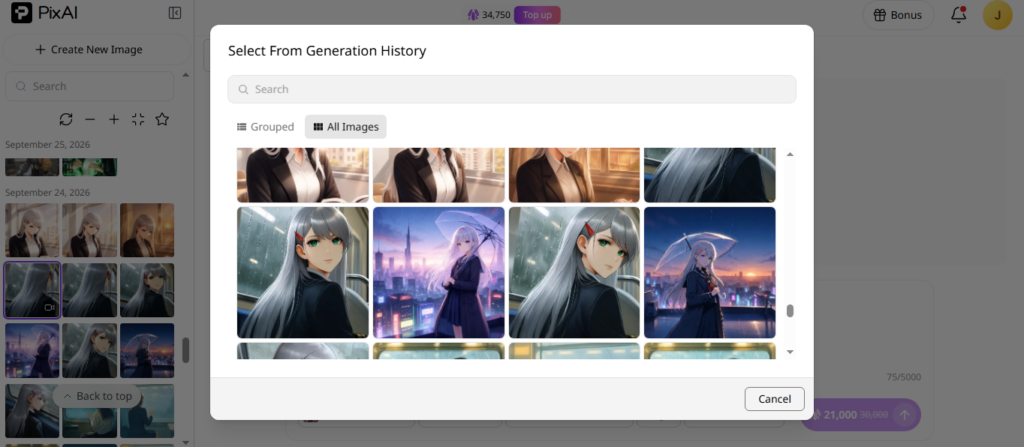
Before you pay or spend hours uploading files, make sure the anime AI video generator platform lets you bring your own art. Check whether the tool lets you upload local images or locks you into using files you generated within their network.
Platforms like PixAI handle this well because they let you pull pictures straight from your hard drive or reuse your past creations. Runway Gen 4.5 is another great choice that handles direct image-to-video animation from an upload.
If you already poured hours into a finished character design, this exact setup saves valuable time. You can jump straight into animating the scene instead of rebuilding your character from scratch.
How much control do you have over motion?
You need a setup that lets you control the action and camera angles. If you are working on a close-up portrait, you might just want a slow blink or a slight tilt of the head. For a massive landscape scene, you could add things like pouring rain, blowing clothes, or drifting clouds.
Focus your text prompts purely on the movement itself rather than wasting words describing details the AI can already see in your picture. Just remember to keep your initial instructions short to avoid overloading the AI. Also, packing too many details into a prompt makes it impossible to figure out which word caused the animation to glitch out.
What output format and length do you get?
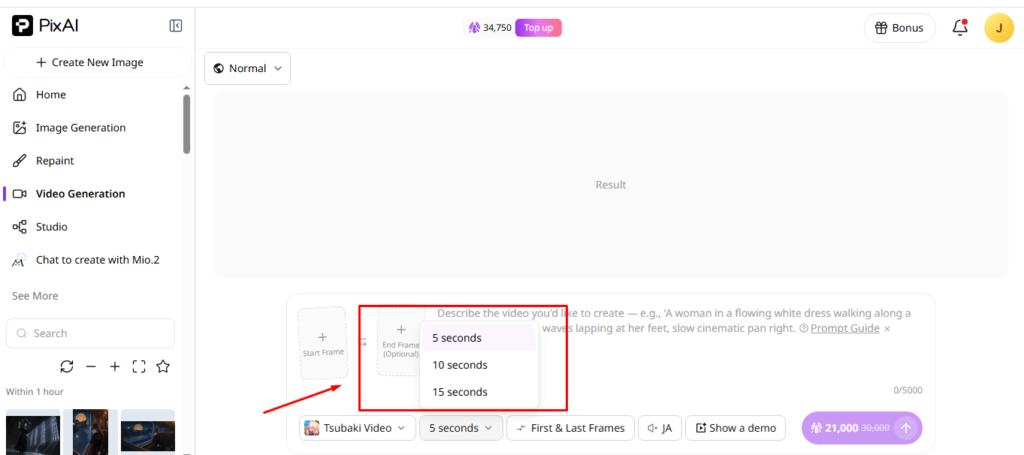
The length and the shape of your video determine how easily the final clip fits into your project. PixAI’s standard setup gives you 5 or 10-second videos, though v4 Preview lets you stretch them to 15 seconds. Always look at the current limits before you hit generate. Vertical shapes are perfect for TikTok, Instagram Reels, or YouTube Shorts, while widescreen clips make more sense if you want a cinematic look.
What does access involve?
Creating videos uses way more credits than generating a flat image, especially when you have to run the prompt a few times to get it right.
PixAI lets subscribers generate video, but the exact features you get depend entirely on which tier you pay for. The platform also gives you free daily credits, and its signup rules change often, so double-check the latest pricing and access limits before you start a massive project.
How much can the image change?
AI models must generate motion without destroying your character identity. Expect facial features, hairstyles, accessories, and clothing to warp during generation, especially in highly detailed illustrations, but the best tools can keep your character recognizable.
Test your animation with minimal movement first, then review the full clip to confirm the character’s appearance stays consistent throughout.
A Shortlist of Anime AI Video Generators
The following tools let you animate or create videos from your illustrations, but they support different creative workflows.
1. PixAI
Suitable task: Animating anime illustrations within an anime-focused creative workflow.
Relevant capability: PixAI supports image-to-video generation, motion prompting, and start- and end-frame controls in supported modes. Its v4.0 Preview series adds features such as multiple image and video references, camera controls, and clips up to 15 seconds.
Access conditions: Video generation is a member feature, with capabilities varying by membership plan.
Limitation: Repeated generations can quickly consume credits. Start with a simple prompt, inspect the result, then try more elaborate motion.
2. Runway
Suitable task: Image-to-video generation as part of a broader generative-video workflow.
Relevant capability: Gen-4.5 supports 2- to 10-second clips, multiple aspect ratios, camera choreography, and standard 720p output.
Access conditions: Gen-4.5 requires the Standard plan or higher and costs 12 credits per second.
Limitation: Runway serves a broad range of video projects. Test how well it preserves distinctive anime character details before using it for a larger sequence.
3. Luma Dream Machine
Suitable task: Visual experimentation involving camera movement, keyframes, and video extensions.
Relevant capability: Luma supports image-to-video generation, start and end keyframes, looping, camera movement, and video extension.
Access conditions: Dream Machine uses a credit system, with costs depending on the model, duration, and resolution.
Limitation: Its workflow covers a wide range of visual styles and video tasks, so anime creators should evaluate its results using their own illustrations.
PixAI as a Practical Example
Let us look at how this plays out in the real world using PixAI. Imagine you just finished drawing an original anime portrait of a female mage standing inside an old library. She has long silver hair, a dark blue cloak, and a glowing magical orb floating right next to her.
To build a quick character preview, you should start with a very simple and controlled motion prompt. For instance. you could tell the tool that the mage slowly blinks and turns her head slightly toward the glowing orb. Her silver hair moves gently in a light breeze, the magical light flickers softly, and the camera slowly pushes in toward her.
Every single instruction there serves a purpose. The blink and head turn bring the character to life, the hair adds environmental movement, and the camera push gives the shot genuine depth.
Upload your illustration to PixAI or pick it straight from your past generation history. Choose a supported video model, pick your clip length, and drop in your prompt. Start with a 5-second clip because it’s much easier to spot weird visual glitches or unwanted changes.
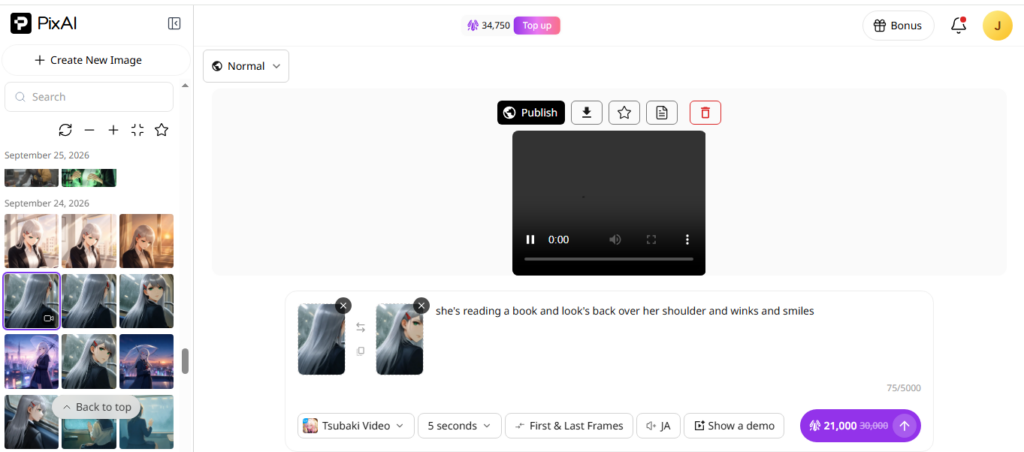
If you need your character to move between two completely different poses, PixAI has specific modes that let you upload both a starting frame and an ending frame. You give the system your opening picture and your destination layout, and the AI builds the transition between them. Just remember you still need to check those middle frames to make sure the art style does not warp.
For a full breakdown of how to tweak these settings, check out the official PixAI image-to-video guide.
What to Inspect in the Result
Watch the entire clip before deciding whether it’s ready to share. Focus on the details that define the character and the elements that should remain stationary.
Face and eyes
Check whether the character retains the same facial features after blinking or turning. Small changes in eye shape, expression, or facial proportions can be particularly noticeable in close-ups.
Hair and clothing
Look for unexpected changes in hairstyle, clothing shape, accessories, or proportions. If these details shift significantly, try simplifying the prompt or reducing the requested movement.
Background
Check whether bookshelves, windows, and other stationary objects remain consistent. Architectural lines may distort, or background elements may move unexpectedly. These are areas to inspect, not problems that occur in every generation.
Unwanted movement
Compare the result with your original instructions. If you requested a blink and gentle hair movement, an unexpected zoom or dramatic head turn may indicate that the prompt needs simplifying.
When a Separate Editor Helps
The generated clip may need a little editing before you share it. You might want to trim the beginning, add a character name, include music, or combine several shots.
CapCut can handle basic trimming, text overlays, music, and social media exports. DaVinci Resolve offers more extensive control over timing, transitions, audio, and titles.
Editing becomes especially useful when you combine multiple AI-generated shots. You can arrange the clips, control their timing, and add transitions without regenerating the entire sequence.
Conclusion
When you are ready to try this out, pick an illustration that genuinely matches the style of work you normally create. Give the engine one simple task at a time, like making the eyes blink, drifting the hair, or adding a gentle camera push.
Take a close look at the final clip before you try complicated, heavy movements. This strategy shows you exactly how well the engine holds onto your character details and helps you figure out which specific phrase structures play nice with your art.
If you already use PixAI to generate your anime art, their video toolkit is a natural next step for bringing finished images into an animation workflow. Check out their PixAI image-to-video guide and test a tiny clip using your own artwork to see what it can do.
Choose an illustration that represents the kind of artwork you actually create. Give the model one clear task, such as animating a blink, moving the character’s hair, or introducing a subtle camera push.
Review the result before attempting more complicated movements. You’ll learn how well the tool preserves your character and which prompts work best for your artwork.
If you already use PixAI to create anime illustrations, its video tools provide a practical way to bring finished images into an animation workflow. Explore PixAI’s image-to-video guide and try a short clip with one of your own illustrations.